Setup For Labs
To be prepared for the labs, you'll need the following installed on your machine:
- Java 8 (only), see Java Installation
- Maven 3: see Maven Installation
- IntelliJ IDEA 2018.2: see IDEA Installation
- Git: see the git web site
Once everything is installed, you can clone the repository to your machine and then run the tests and open it in IntelliJ IDEA.
A. Clone the Repository
-
Change to your projects directory, or make one for this training class, e.g.:
- Windows:
mkdir C:\trainingand thencd \training - Mac:
mkdir ~/trainingand thencd ~/training
- Windows:
-
Clone the project repository from GitHub to your machine by doing:
git clone https://github.com/spiral-learning/cvm.git-
If you are still having trouble, download and unzip the project instead. You can do this by opening up a browser, and going to this URL:
https://github.com/spiral-learning/cvm/archive/master.zip
-
B. Use Maven to Run the Test
Now use Maven from the command line to download the project dependencies and run the tests.
-
Change to the directory holding the project:
- Windows:
cd \training\cvm - Mac:
cd ~/training/cvm
- Windows:
-
Run the
testtask in Maven by doing:mvn test -
Maven will download a bunch of files, so this could take a few minutes. Once it's finished downloading the files, it will compile the code and run the 1 (and only) test in the project. If all goes well, you should eventually see something like:
Results :

Tests run: 1, Failures: 0, Errors: 0, Skipped: 0

[INFO] ---------------------------------------------------------------------
[INFO] BUILD SUCCESS
[INFO] ---------------------------------------------------------------------
[INFO] Total time: 4.706 s
[INFO] Finished at: 2017-09-11T10:39:51-07:00
[INFO] Final Memory: 20M/437M
[INFO] ---------------------------------------------------------------------
C. Open Project in IntelliJ IDEA
Now that all the dependencies have been downloaded and the project works, let's open it up in IDEA.
-
Launch IntelliJ IDEA
-
Open the
pom.xmlfile by doing the following:- If you see the Welcome screen, choose
Open(not Import)
Otherwise...
- From the
Filemenu, choose theOpen...to open thepom.xml(don't use Import) in the project directory.
- If you see the Welcome screen, choose
-
IDEA will then ask you how to open this file. Since we want it to be a new project, click
Open as Project.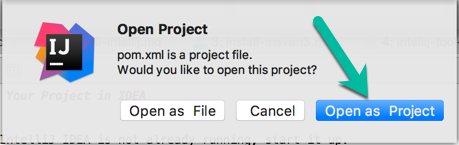
-
The project will load and IDEA will do some indexing, which may take a few minutes.
D. Run the Test in IDEA
-
Once the indexing completes, navigate to the
CoffeeVendingMachineApplicationTestclass -- Note: this is the test class, not the application class. -
Click on the green arrow next to the left of the class name
-
The test results will show up in a bottom window pane and should be green, i.e., the single test passed.
You are done!